Welcome back to the third installment of my Pet Portrait Painting, Step by Step: Abbey Blog post! Today we will start to paint Abbey! Here is how it will unfold: I will, in sequence, show one or two pictures at a time with a brief explanation of what was happening at that time during the work. To enlarge these pictures just click on them to get the full view, then click them again and they will enlarge! Lets Do It!!!

- Step by Step: Abbey #11
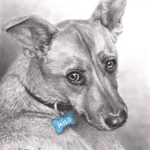
When I paint a Portrait, as we saw in Blog post #2 of this series, I always start with, and finish, the background before putting any paint on the animal. I really want the subject of the painting (the animal) to stand out in front of what is going on in the background. In picture #11 above I have finally started to paint Abbey. When working in Acrylic, and Pastel, I always start to paint the animal in the same way; from the animals, in this case Abbey’s right ear moving down and from the upper left of the canvas to the lower right. I do this for two reasons. Number one, most of the time I paint right handed (yes there are times I also need to paint lefty as well) So I want to be painting in an area that is not covered in any way by my brush, hand , or arm. Moving from upper left to lower right continuously gives me a clear view of my work as I execute it. Secondly, it keeps everything I have finished clean. There is no chance of any drips or water or smudging on a finished area because I will not be painting across it. I will of course do small touch ups and correction throughout the work, anywhere on the canvas where they are needed. but the bulk of the paint gets appropriated in this top to bottom, left to right fashion. Here in #11 I am just beginning to lay in a medium tonal ground which I will soon build upon.

Step by Step: Abbey #12

Step by Step: Abbey #13
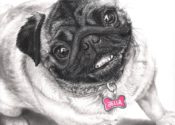
In picture #12 I have detailed Abbeys right ear, and have started working around the right eye. I always paint the surrounding areas of the eyes before I paint the eyes themselves. I really need to get the shapes and nuances of the occipital areas correct so that when I do paint the eyes I do not need to keep adjusting them if something is off. The eyes are the most important part of the portrait any little thing that is askew is easily seen by everyone!! Picture #13 is a closeup of #12. Also you can see I have started to work ahead of myself a little and have begun the medium tones for the snout and Abbeys left eye area. I will always do this, blending one area into the next.

Step by Step: Abbey #14
In picture #14 I have pretty much finished around Abbey’s right eye and have blocked in the pupil and iris color. No shading or blended highlighting yet, at this point I am mixing colors trying to match that eye color with my reference material and my notes.

Step by Step: Abbey #15

Step by Step: Abbey #16
In picture #15 I have shaded and highlighted Abbey’s right eye. Picture #16 is a close up view. I will always go back, throughout the painting of a portrait, and make little adjustments to the eyes. They have to be perfect, but at this point I am ready to continue across Abbeys forehead to her upper left quadrant.
All of the work you saw and read about today took me approximately 6 hours to complete. Thank you for reading my Blog here on Pet Portraits By Cy. Check back next week for Blog post #4 in this “Pet Portrait Painting, Step by Step: Abbey” series. If you know some art lovers or other painters out there who may find this interesting or educational, feel free to share this. Also I will be happy to answer any questions you may have throughout this series of Blog posts, You can click the “leave a comment” link here in this Blog post or you can comment on my Pet Portraits By Cy Facebook fan page: http://www.facebook.com/petportraitsbycy Have a great day everyone! Cy