Welcome to the fourth installment of my Pet Portrait Painting, Step by Step: Abbey Blog post! Today we will continue painting Abbey, moving right, across the painting to her left ear and left eye. Here is how it will unfold: I will, in sequence, show one or more pictures at a time with a brief explanation of what was happening at that time during the work. To enlarge these pictures just click on them to get the full view, then click them again and they will enlarge! Lets Do It!!!

Step by Step: Abbey #17
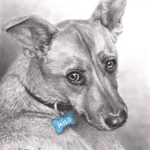
At the end of the third installment on this Abbey, Step by Step blog post series, I had just finished painting her right eye. Now as you can see in Picture #17 I have moved across the canvas to the right and am developing the left side of her ear and eye area. Other areas, the snout and lower, are recieving primary medium tones. As I mentioned in the last post, I always work ahead of myself a little so I am constantly blending one finished area into the next partially finished one to keep the transition seamless.

Step by Step: Abbey #18

Step by Step: Abbey #19
Pictures #18 and #19 show the further development of this area. Picture #18 is the first pass, if you will, and the subsequent finish, which, as you can tell is more detailed, is featured in #19. At this point I have detailed all of the areas around her left eye, and can start laying in color on this most important section. Also you can tell I have worked my way down the bridge of Abbey’s nose and the left side of her face in preparation for the painting of the snout.

Step by Step: Abbey #20

Step by Step: Abbey #21

Step by Step: Abbey #22
Pictures #20, 21 and 22 show the first progressions on Abbey’s left eye. Picture #21 is a close up of picture #20. Just as with the right eye, I have first just laid in the color, carefully matching it to my reference photos, and my notes..AND, now I need to match it to her right eye color as well.

Step by Step: Abbey #23
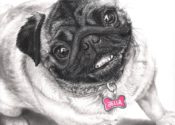
In Picture #23 I have finished Abbeys left eye. As I have stated before, throughout the rest of this painting I will continually be scrutinizing both eyes and may make small modifications to further dial them in to perfection. I cannot emphasize enough how important it is in any Pet Portrait, that the eyes be ACCURATE. Directly after I finished the left eye, you can also see in picture #23 that I have continued work on the snout and have laid in the first strokes in the actual nose area.
All of the work you saw and read about today took me approximately 6 hours to complete. Thank you for reading my Blog here on Pet Portraits By Cy. Check back next week for Blog post #5 in this “Pet Portrait Painting, Step by Step: Abbey” series. If you know some art lovers or other painters out there who may find this interesting or educational, feel free to share this. Also I will be happy to answer any questions you may have throughout this series of Blog posts, You can Email me from my website, or click the “leave a comment” link here in this Blog post, or you can comment on my Pet Portraits By Cy Facebook fan page: http://www.facebook.com/petportraitsbycy Have a great day everyone! Cy