Pet Portraits In Charcoal “Beamer”

"Beamer" Pet Portraits In Charcoal

"Beamer" Pet Portraits In Charcoal

 Click on this picture, then click on the next version of it to enlarge!

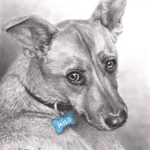
“Beamer” welcomes you to my next Pet Portraits In Charcoal Blog post! You can learn how you and your pet can become involved in your own Pet Portrait/Blog Post at the end of  Beamers story. Beamer is a special dog with a special owner. I was commissioned to draw Beamer for Brandon.  His Mom Claudia contacted me from Texas and she needed a graduation gift for Brandon, who was graduating from Medical school. Quite the accomplishment but even more impressive because he also is a Navy officer having graduated from the US Naval Academy in Annapolis Maryland.  He will be a Navy doctor.  I enjoyed this story because I grew up in a Navy family and actually lived in Annapolis while my dad worked on the Academy during my high school years.

Brandon  Rescued Beamer from a shelter so they are not sure exactly what breed he is.  They believe he is part Beagle and maybe some Boston Terrier. His looks, unique bark and love of chasing squirrels all point to these as the probable ancestry.  Brandon chose Beamer due to the fact that he was always wagging his tail, Claudia states, ” His name comes from the fact that he beams and makes you happy”

I have nicknamed Beamer  the “Navy Dog”  not only because of his military ties but also because of the picture below. This is the Bachelor cake for Brandon’s wedding.  As you can see another artist did a great job of portraying Beamer as a Naval Officer. I do not know if the cake tasted good or not….

Beamer USNA cake
Beamer USNA cake

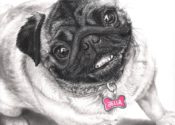
 The Beagle has a very ancient history, most believe it is close to the original hound that existed in England centuries ago. The Beagle is a somewhat smaller version of the Foxhound. This breed has an endless reserve of energy and loves to chase rabbits and squirrels. He is mainly a family dog and thoroughly enjoys people and is especially good with children. He is very enthusiastic and fun but does have a tendency to wander off  if  left on his own. The Boston Terrier was one of the few breeds developed in the United States. He is a cross between an English Bulldog and an English Terrier. This breed excels as a show dog and as a household pet. He has a great affection for humans and displays a gentle disposition. This breed works well mixed with a Beagle.

I hope you have enjoyed this Pet portrait In Charcoal Blog Post about Beamer!  Next up I will be introducing you all to a miniature horse and a fun little team comprised of a Bulldog and a Yorkie Doodle.
 If you would like your pet, or a friends pet portrayed in an 11 x 14 in. Charcoal Portrait sent to you, (or anyone you choose), anywhere in the world, and have the animal included in one of these blog posts for the world to see… Please visit this link and get the Info!   http://www.petportraitsbycy.com/?page_id=743
Thank you for reading this and as always…Have fun with your animals!
Cy

Pet Portraits In Charcoal, “Sarge”

"Sarge" Pet Portraits In Charcoal
“Sarge” Pet Portraits In Charcoal

Click on this picture, then click on the next version of it to enlarge! 

Welcome back to my Pet Portraits In Charcoal Blog!  Please read on about Sarge,  his breed, and other Pet issues…WHEN YOU FINISH…If you would like your pet, or a friends pet portrayed in an 11 x 14 in. Charcoal Portrait sent to you, (or anyone you choose), anywhere in the world, and included in one of these blog posts for the world to see… Please visit this link and get the Info!   http://www.petportraitsbycy.com/?page_id=743

Sarge is a German Short Haired pointer. I drew this Portrait and donated it for a silent auction at an up coming Easter Seals fundraising event in Ephrata Washington. I will talk more about both this event and Sarges breed shortly, but first I am going to quote Sarges owner Maria as she shared some fun info about him for this blog post:

“This is Sarge he is a beautiful, sweet, affectionate and hyper German short haired pointer. He is an awesome hunting dog. He is 3 years old and is our pride and joy. And honestly our baby. This picture he is begging for an ice cube (his favorite treat) He came up and rested his cute little face on my knee. The look here says ( Oh please MaMa, please can I have a coobey ) That’s what we call them. He is very good at pleading with those adorable eyes.  Sarge is the best dog ever. I have never liked dogs ever. My husband said ( I am getting a hunting dog) and I tell you he has melted my heart. Such an affectionate breed, very social and eager to please. And Boy can they hunt!!   Sarge got his name from……….He was made, born and lived for the first 6 weeks in the back of a Army surplus store! Hence the name. It seemed to fit. Not a mean bone in this dogs body. And the most beautiful sight I have ever seen, I really do mean this, is when he gets to do what he was bred to do. HUNT! Brings me to tears to see the utter bliss on his face when he is running in the brush :)”

Well said Maria!  Sarge’s social attributes and friendly fun disposition was well stated above. Here are a few more facts about The German Short Haired Pointer:

He was bred in Germany as an “all Purpose” hunting dog. His origins include Old Spanish Pointer, English Foxhound and Bloodhound. He has a keen nose, excellent endurance, a water repellent coat and even webbed feet! This all adds up to an fine retriever in the water. He is able to hunt under any conditions, can be trained to point, as is considered one of the best and most versatile  of the sporting breeds.

As I mentioned earlier, this piece was donated for a silent auction at an Easter seals fundraiser. This event is taking place on saturday April 21st, 2012 in Ephrata Washington and is sponsored by the nice folks at the Ephrata Safeway.  The event also will include a spaghetti feed and some other fun activities, with all of the proceeds going to the great charitable organization of Easter Seals. For information on this event please contact the Ephrata Safeway, a very nice lady named Janice can answer any questions you may have. here is the  Safeway stores number: 509-754-4441

I was honored to be asked to help with this fine cause. I had a great time drawing, and learning about Sarge. He is a wonderful dog and as you can tell he is blessed with a  loving family.  Thank you Janice and  Maria, and best of luck to you, and to your families and of course to Sarge as well!

 Thank you for reading My Pet Portraits In Charcoal Blog. Please share this Blog Post with anyone who may be interested.  And if you are in the Ephrata/Wenatchee area please consider supporting the Easter Seals at Janice’s event.   A good day to all, and of course to all of your pets as well! Cy

Pet Portraits In Charcoal, “Boku”

"Boku" Pet Portraits In Charcoal

"Boku" Pet Portraits In Charcoal

 Happy Easter everyone!  This is Boku, and He lived in Japan!  He was owned by Sachico who lives on Awaji Island.  This Island is located just south of the city of Kobe in the eastern part of the Seto Inland sea. It is connected to Kobe by the longest suspension bridge in the world.  Boku’s breed in Japan is called “Kiji Neko” I was commissioned to draw Boku by Sachico’s daughter.

I was Honored to be chosen to portray Boku in a Charcoal Portrait, and have it delivered all the way to Japan.  Sachico apparently loves the picture and even talks to it. I am very happy to give her some good memories and allow Boku to live on in this small way.  He was, as you will read below, a very special animal.

In her own words Sachicos daughter was gracious enough to share what her mom told her about this special kitty: 

“The name ” Boku ” is funny for the cat because it is a word to call a little boy when we don’t know the name of a little boy in Japan. I guess that cat ” Boku ” was a little boy to my mom. At first,he had a different name but we don’t remember what it was. My mom and ” Boku ” met long time ago.
One day someone brought a kitten to show her, it was in the box for the fishing food. My mom fell in love immediately when she saw it’s cute eyes and since he became her cat. I was glad it was a cat and wasn’t a dog. She doesn’t know how to take care the dog at all.

There were something very funny and I liked watching was ” Boku ” used play with grocery bag. He liked running in to it and it looked like bag was moving alone . He used do it over and over. It was just funny.I think he was nicest looking guy in the ” hood ” and he used come home injured so bad often. Tough world!!! Right?

 He used live with mom for 10 years and since he past a way it has been 14 years. I couldn’t believe it has been so long time! She never got any animal since then. It was too sad when she lost him.”


Pet Portrait Painting, Step by Step: Abbey #6

Welcome  to the Sixth, and last installment of my Pet Portrait Painting, Step by Step: Abbey Blog post!  Today we will actually finish the Abbey Pet Portrait! Here is how it will unfold:  I will, in sequence, show one or more pictures at a time with a brief explanation of  what was happening at that time during the work. To enlarge these pictures just click on them to get the full view, then click them again and they will enlarge! Lets Do It!!!

Step By Step: Abbey #30

 In picture #30 we are starting to develop Abbey’s chest area and any other areas that exist in the foreground. I have, at this point, laid in the first layers of paint. If you look closely I have rotated this picture so it shows the upright position. Actually the canvas is setting on its left side.  The reason for this is that I am continuing to paint  the chest area under and around the bottom edge of the canvas.

Step By Step: Abbey #31

Step By Step: Abbey #31

In picture #31 you can see the development of the bottom edge. As I mentioned at the beginning of this project, I always paint the edges of my paintings. It gives them a finished look and they can be hung as is without a frame.

Step By Step: Abbey #32

Step By Step: Abbey #32


Step By Step: Abbey #33

Step By Step: Abbey #33

Pictures #32 and #33 show the next two stages of Abbey’s chest development. As you can see I have added color and detail as this area has progressed. It was important for me to get her white spot just right, so a fair amount of time was spent here.

Step By Step: Abbey #34

Step By Step: Abbey #34

Step By Step: Abbey #35

Step By Step: Abbey #35


In picture # 34 I have finished the chest area and have finally added the whiskers. Aside from the signing of the piece, the whiskers will always be the last thing that I paint. This is because they are forward of everything else and they need to be very clean and sharp looking. If I was not finished with the fur areas of the neck and snout and chest, and painted the whiskers, then I would have to work around them and it would not look clean and convincing. It goes back to our first rule;  Paint from the back to the front, painting the areas closest to the viewer last.  Picture #35 is a closeup of the finished whiskers.

Step By Step: Abbey #36

Step By Step: Abbey #36

We have reached our last picture! #36 shows the finished piece. I have made touch ups and I have signed it in the bottom right hand corner. What I will do now is just sit with it for a day and watch it. If I see anything that needs attention I will touch it up. Throughout the execution of the Portrait I have been pretty methodical about finishing one area before going to the next, so there usually is not alot of reworking or touching up to do. You still need to watch a finished piece, before you deliver it though, just to be sure.

All of the work you saw and read about today took me approximately 6 hours to complete. The whole Portrait from start to finish took approximately 38 hours to complete.  Thank you for reading my Blog here on Pet Portraits By Cy. I hope you have enjoyed this “Pet Portrait Painting, Step by Step: Abbey” series. If you know some art lovers or other painters out there who may find this interesting or educational, feel free to share this. Also I will be happy to answer any questions you may have throughout this series of  Blog posts,  You can Email me from my website,  or click the “leave a comment” link here in this Blog post, or you can comment on my Pet Portraits By Cy Facebook fan page: http://www.facebook.com/petportraitsbycy  Have a great day everyone! Cy

Pet Portrait Painting, Step by Step: Abbey #5

Welcome  to the fifth installment of my Pet Portrait Painting, Step by Step: Abbey Blog post!  Today we will continue painting Abbey, moving down the length of her snout developing and finishing  her nose and mouth. Here is how it will unfold:  I will, in sequence, show one or more pictures at a time with a brief explanation of  what was happening at that time during the work. To enlarge these pictures just click on them to get the full view, then click them again and they will enlarge! Lets Do It!!!

Step By Step: Abbey #24

Step By Step: Abbey #24

At the end of our last Step by Step: Abbey Blog post I had just finished with her left eye and was starting to work down the snout and into the nose area. We pick it up here with picture #24. I have laid in more detail on the nose.  If the eyes are the most important facial feature in a Pet Portrait, the nose is a close second.  As the observer, the nose, in most pictures and paintings, will be the closest thing to you,(Except if you are working with a Bulldog or Pug). For this reason it has to look accurate and natural. Dogs noses are moist, the light will reflect, this needs to be shown as well.  The nose is not finished yet in this photo but it is getting close. There are still no highlights and I need to make sure the nostril shapes are sized correctly and are even.

Also in picture #24 you will see a piece of paper with some notes on it. Throughout the execution of a Portrait such as this, I will periodically write down things I need to change, work on,or remember. This note is reminding me to rework the ears and the forehead a little. I will usually take care of these changes during my next painting session.

Step By Step: Abbey #25

Step By Step: Abbey #25

Step By Step: Abbey #26

Step By Step: Abbey #26

In picture #25 I have pretty much finished the nose on Abbey. I will still, like with the eyes, go back and make small adjustments, mainly with highlights, but for now I am ready to continue lower into the mouth area of the snout.  Picture #26 is a closeup of #25, and you can see my notes are gone, so I had made those other little adjustments before I continued into the next area.
Step By Step: Abbey #27

Step By Step: Abbey #27

 In Picture #27 I have been detailing the mouth region, and have continued as always with my initial base coats of the neck/chest area.  Again, always working ahead of myself a little to keep the whole picture flowing evenly and seamless.

Step By Step: Abbey #28

Step By Step: Abbey #28

Step By Step: Abbey #29

Step By Step: Abbey #29

Pictures #28 and #29 show the finished snout area,(minus the whiskers). #29 is a close up of #28.  There may not seem to be much of a difference between these two pics and Picture #27,  but if you look closely I have darkened and detailed the areas directly on the sides of Abbeys snout, under her nose, and have adjusted some values above her nose area as well.  Whiskers you ask? Or at least I will ask for you, They come later, and I will explain at that point why they need to be one of my final moves on a Pet Portrait. 

All of the work you saw and read about today took me approximately 5 hours to complete.  Thank you for reading my Blog here on Pet Portraits By Cy. Check back next week for Blog post #6, the last installment in this “Pet Portrait Painting, Step by Step: Abbey” series. If you know some art lovers or other painters out there who may find this interesting or educational, feel free to share this. Also I will be happy to answer any questions you may have throughout this series of  Blog posts,  You can Email me from my website,  or click the “leave a comment” link here in this Blog post, or you can comment on my Pet Portraits By Cy Facebook fan page: http://www.facebook.com/petportraitsbycy  Have a great day everyone! Cy

Pet Portrait Painting, Step by Step: Abbey #4

Welcome  to the fourth installment of my Pet Portrait Painting, Step by Step: Abbey Blog post!  Today we will continue painting Abbey, moving right, across the painting to her left ear and left eye.  Here is how it will unfold:  I will, in sequence, show one or more pictures at a time with a brief explanation of  what was happening at that time during the work. To enlarge these pictures just click on them to get the full view, then click them again and they will enlarge! Lets Do It!!!

Step by Step: Abbey #17

Step by Step: Abbey #17

At the end of the third installment on this Abbey, Step by Step  blog post series, I had just finished painting her right eye. Now as you can see in Picture #17  I have moved across the canvas to the right and am developing the left side of her ear and eye area. Other areas, the snout and lower, are recieving primary medium tones. As I mentioned in the last post, I always work ahead of myself a little so I am constantly blending one finished area into  the next partially finished one to keep the transition seamless.

Step by Step: Abbey #18

Step by Step: Abbey #18

Step by Step: Abbey #19

Step by Step: Abbey #19

 Pictures #18 and #19 show the further development of this area. Picture #18 is the first pass, if you will, and the subsequent finish, which, as you can tell is more detailed, is featured in #19. At this point I have detailed all of the areas around her left eye, and can start laying in color on this most important section. Also you can tell I have worked my way down the bridge of Abbey’s nose and the left side of her face in preparation for the painting of the snout.

Step by Step: Abbey #20

Step by Step: Abbey #20

Step by Step: Abbey #21

Step by Step: Abbey #21

Step by Step: Abbey #22

Step by Step: Abbey #22

Pictures #20, 21 and 22 show the first progressions on Abbey’s left eye. Picture #21 is a close up of picture #20. Just as with the right eye, I have first just laid in the color, carefully matching it to my reference photos, and my notes..AND, now I need to match it to her right eye color as well.

Step by Step: Abbey #23

Step by Step: Abbey #23

In Picture #23 I have finished Abbeys left eye. As I have stated before, throughout the rest of this painting I will continually be scrutinizing both eyes and may make small modifications to further dial them in to perfection. I cannot emphasize enough how important it is in any Pet Portrait, that the eyes be ACCURATE.  Directly after I finished the left eye, you can also see in picture #23 that I have continued work on the snout and have laid in the first strokes in the actual nose area.

All of the work you saw and read about today took me approximately 6 hours to complete.  Thank you for reading my Blog here on Pet Portraits By Cy. Check back next week for Blog post #5 in this “Pet Portrait Painting, Step by Step: Abbey” series. If you know some art lovers or other painters out there who may find this interesting or educational, feel free to share this. Also I will be happy to answer any questions you may have throughout this series of  Blog posts,  You can Email me from my website,  or click the “leave a comment” link here in this Blog post, or you can comment on my Pet Portraits By Cy Facebook fan page: http://www.facebook.com/petportraitsbycy  Have a great day everyone! Cy

Pet Portraits In Charcoal “Bear”

"Bear" Pet Portraits In Charcoal

"Bear" Pet Portraits In Charcoal


Click on this picture, then click on the next version of it to enlarge! 

Welcome back to my Pet Portraits In Charcoal Blog!  Please read on about  Bear,  his breed, and other Pet issues…WHEN YOU FINISH…If you would like your pet, or a friends pet portrayed in an 11 x 14 in. Charcoal Portrait sent to you, (or anyone you choose), anywhere in the world, and included in one of these blog posts for the world to see… Please visit this link and get the Info!   http://www.petportraitsbycy.com/?page_id=743

Bear is a very unique looking and beautiful dog, He is half German Shepherd and half Malamute.  Bear is owned by Elisa and Mike from Broomfield Colorado. If these names sound familiar its because they were also the owners of “Shadow” from a previous Blog post. Bear was adopted by Elisa and Mike because they wanted a friend for Shadow. Bear is 14 years old and although he has had 3 surgeries, 2 on his knees and one to correct a stomach problem , he is doing  just fine. When Shadow was alive,  Bear spent many years  as his companion,  and they were indeed best of friends.

Shadow was the Alpha between the two, and Bear apparently always wanted to play and rough house with him especially as a puppy. Bear got his name because when he was first spotted by Elisa he looked like a stuffed bear toy, soft and fluffy. Bear is friendly to strangers, and will on occasion bring a toy to you to play with him, but he also can be a bit dramatic and emotional and is very protective of his family. he knows if one of his masters is not feeling well and he is very intuitive.  Mike tells me he is a little set in his ways and can be a little high maintenance, but at his age we all figure he has earned that right.

The German shepherd is the result of selective breeding, originally the stock came from various herd and work breeds. This breed is used extensively in police work.  He is very strong and sturdy and is unconditionally loyal. Once this dog extends his loyalty he will not transfer it easily and his owner must be willing to maintain this close bond. Bear has all of these traits.  The Alaskan Malamute is a sled dog, named after  the tribe that bred him. Legend has it that his ancestors were wolves, he is heavily muscled and is a very hard worker, he does love to pull a sled and is still used primarily for this job. The malamute  has a mild disposition and is a great family dog, and is good with children.  Bear also exhibits the best qualities from this breed as well.

Bear comes down from, I believe,  two of the most beautiful dog breeds. He shares, along with certain characteristics of both, the good looks of both as well. Certainly a pleasure for me to capture him in Charcoal. Thank you Bear, Elisa and Mike for the opportunity.

  Thank you for reading My Pet Portraits In Charcoal Blog. Please share this Blog with anyone who may be interested. Coming up next will be the 4th installment of my Pet Portrait Painting, Step by Step:” Abbey” series!  A good day to all, and of course to all of your pets as well! Cy

Pet Portrait Painting, Step by Step: Abbey #3

Welcome back to the third installment of my Pet Portrait Painting, Step by Step: Abbey Blog post!  Today we will start to paint Abbey!  Here is how it will unfold:  I will, in sequence, show one or two pictures at a time with a brief explanation of  what was happening at that time during the work. To enlarge these pictures just click on them to get the full view, then click them again and they will enlarge! Lets Do It!!!

Step by Step: Abbey #11

When I paint a Portrait, as we saw in Blog post #2 of this series, I always start with, and finish, the background before putting any paint on the animal. I really want the subject of the painting (the animal) to stand out in front of what is going on in the background.  In picture #11 above I have finally started to paint Abbey. When working in Acrylic, and Pastel, I always start to paint the animal in the same way; from the animals, in this case Abbey’s  right ear moving down and from the upper left of the canvas to the lower right.  I do this for two reasons. Number one, most of the time I paint right handed (yes there are times I also need to paint lefty as well) So I want to be painting in an area that is not covered in any way by my brush, hand , or arm. Moving from upper left to lower right continuously gives me a clear view of my work as I execute it. Secondly, it keeps everything I have finished clean. There is no chance of any drips or water or smudging on a finished area because I will not be painting across it.  I will of course do small touch ups and correction throughout the work, anywhere on the canvas where they are needed. but the bulk of the paint gets appropriated in this top to bottom, left to right fashion. Here in #11 I am just beginning to lay in a medium tonal ground which I will soon build upon.

Step by Step: Abbey #12

Step by Step: Abbey #12

Step by Step: Abbey #13

Step by Step: Abbey #13

In picture #12 I have detailed Abbeys right ear, and have started working around the right eye. I always paint the surrounding areas of the eyes before I paint the eyes themselves. I really need to get the shapes and nuances of the occipital areas correct so that when I do paint the eyes I do not need to keep adjusting them if something is off. The eyes are the most important part of the portrait any little thing that is askew is easily seen by everyone!! Picture #13 is a closeup of  #12. Also  you can see I have started to work ahead of myself a little and have begun the medium tones for the snout and Abbeys left eye area. I will always do this, blending one area into the next.

Step by Step: Abbey #14

Step by Step: Abbey #14

In picture #14 I have pretty much finished around Abbey’s right eye and have blocked in the pupil and iris color. No shading or blended highlighting yet, at this point I am mixing colors trying to match that eye color with my reference material and my notes.

Step by Step: Abbey #15

Step by Step: Abbey #15

Step by Step: Abbey #16

Step by Step: Abbey #16

In picture #15 I have shaded and highlighted Abbey’s right eye. Picture #16 is a close up view. I will always go back, throughout the painting of a portrait, and make little adjustments to the eyes. They have to be perfect, but at this point I am ready to continue across Abbeys forehead to her upper left quadrant.

All of the work you saw and read about today took me approximately 6 hours to complete.  Thank you for reading my Blog here on Pet Portraits By Cy. Check back next week for Blog post #4 in this “Pet Portrait Painting, Step by Step: Abbey” series. If you know some art lovers or other painters out there who may find this interesting or educational, feel free to share this. Also I will be happy to answer any questions you may have throughout this series of  Blog posts,  You can click the “leave a comment” link here in this Blog post or you can comment on my Pet Portraits By Cy Facebook fan page: http://www.facebook.com/petportraitsbycy  Have a great day everyone! Cy

New Pet Portrait By Cy, “Izzie and Belle”

To enlarge this picture just click on it to get the full view, then click it again and it will enlarge! 
Izzie and Belle

Izzie and Belle

 
 Welcome  back to the Pet Portraits By Cy Blog.  I want to share with you my most recent Acrylic Pet Portrait,  “Izzie and Belle”. Izzie and Belle are both Black Labrador Retrievers.  Both Izzie and Belle were brought home on the same day by their owners Lucinda and Bill from Denver Colorado. They were the same age but came from different litters. They were adopted sisters. I am sorry to write, that Izzie passed away shortly after I started this Portrait. She was 14 years old. I was lucky enough to meet her,  and she was a very sweet dog, and had a wonderful life with her sister Belle and her owners, which provided a wonderful home for both of them.  Belle as well as  Lucinda and Bill, has suffered a great loss. I could tell she was sad but she is greatly loved and the three of them, I am sure, will help each other through this.

According to Lucinda, Izzie was the boss between the two dogs while they were growing up. She Loved her Tennis Ball, which she is pictured protecting here. Izzie would fetch her ball for hours with Belle present always, waiting  for her opportunity to snatch the ball away when Izzie got tired and reap the benefits of returning it to her master.  Izzie’s love for balls did not only include the tennis variety, She at times would wander onto the nearby Golf course and would chase the Golf  balls as well!

Izzie and Belle were always together, Their breed as we will see later, love to hunt and track. I was told, that as younger dogs, they would work together to corner and trap rabbits and other small animals on the property. They were always a team.  Even when I was there visiting, and at the age of 14 Belle was rooting through the snow as if looking for something to retrieve and bring back to the doorstep.

The Labrador retriever was once known as a St John’s Newfoundland. They were brought to this country from Labrador by seamen aboard cargo vessels. Labrador is located in  North Eastern North America. Between the Atlantic and the Hudson Bay. Fishermen in this area used these dogs for retrieving  fish that escaped from their nets.  The Labradors lineage is a little obscure although he probably contains many of the same elements that make up the other retrievers. The Labrador enjoys a justly deserved reputation as an excellent, and responsible worker who can retrieve waterfowl and upland birds, both on land and in icy waters many times a day. He is an easy going household companion. loves being part of a family, and has also been used very successfully in police work and as a guide dog for the blind. Labrador Retrievers can be yellow, brown or black, and can weigh between 55 and 70 pounds.

It was a great experience meeting and Painting Izzie and Belle. I consider myself  lucky to have had this opportunity, and I hope that my work properly honors these two beautiful dogs. I also hope that, in a small way, this portrait will help Izzie to live on forever.  Thank you for reading this New Pet Portrait Blog post. Feel free to share this with anyone who may be interested, and check back soon for the Third installment of my Pet Portrait Painting, Step by Step Blog Post series!   Have a great time with your animals! Cy

Pet Portrait Painting, Step by Step: Abbey #2

Welcome back to the second installment of my Pet Portrait Painting, Step by Step: Abbey Blog post!  Now that we are going to get into the actual execution of the art, here is how it will unfold:  I will, in sequence, show one or two pictures at a time with a brief explanation of  what was happening at that time during the work. To enlarge these pictures just click on them to get the full view, then click them again and they will enlarge! Lets Do It!!!

Step by Step: Abbey #2

Step by Step: Abbey #2


Step by Step: Abbey #3

Step by Step: Abbey #3

 I am starting with picture #2, because Abbey #1 was, of course, the blank 16 x 20 in. canvas. The first thing I need to do is draw the lines which I will follow while painting. Here in #2, and the close up in #3, the lines have all been drawn, and at this point I am happy that my drawing is accurate, I will not stop this process until I am. The drawing is the #1 component of an Accurate portrait.

Step by Step: Abbey #4

Step by Step: Abbey #4

After my drawing is complete I need to tape off my animal, as seen here in picture #4…WTH does that mean Cy? Well I paint a portrait from the background (the distance) to the foreground (the front). I want Abbey to be sharp and really appear in front of what is going on behind her. With Abbey taped off I can paint, and finish the entire background with out compromising her lines. Then, when I do paint Abbey, I am literally painting her on top of and in front of the background. This makes for a more clean and convincing composition. LETS PAINT!

Step by Step: Abbey #5

Step by Step: Abbey #5


Step by Step: Abbey #6

Step by Step: Abbey #6

In pictures #5 and #6 I started with the Sky, farthest back. Then removed the tree line tape, and I  painted the trees. These are the most distant compositional areas.  I have also in this picture removed the tape line separating the grass from the tree line.

Step by Step: Abbey #7

Step by Step: Abbey #7


Step by Step: Abbey #8

Step by Step: Abbey #8

In picture #7 I am starting to move even closer to Abbey by painting the grass where she is sitting, again working from back to front. In picture #8 I am showing you that throughout the painting of this portrait I need to also paint the sides. I paint what is called a “Gallery Wrap” on all of my portraits, continuing the picture around the sides of the canvas. This gives the painting a finished look if the owner wants to hang it, as is, without a frame.

Step by Step: Abbey #9

Step by Step: Abbey #9


Step by Step: Abbey #10

Step by Step: Abbey #10

Picture #9 shows the finished background, and Abbey is still taped off. Picture #10 is to me like another blank canvas. I have finished everything but my main subject. I have removed the last of the tape, and I am ready to begin painting Abbey, the real star of the show!!  In the “Pet Portrait Painting, Step by Step: Abbey” post #3,  She will begin to come to life!

All of the work you saw and read about today took me approximately 15 hours to complete.  Thank you for reading my Blog here on Pet Portraits By Cy. Check back next week for Blog post #3 in this “Pet Portrait Painting, Step by Step: Abbey” series. If you know some art lovers or other painters out there who may find this interesting or educational, feel free to share this. Also I will be happy to answer any questions you may have throughout this series of  Blog posts,  You can click the “leave a comment” link here in this Blog post or you can comment on my Pet Portraits By Cy Facebook fan page: http://www.facebook.com/petportraitsbycy